25 Essential Job Search Tips for Immigrants

by WES Advisor


Are you looking for a job in the United States or Canada? Find all of the job search tips you need to succeed, all in one post.

Below, we collected the best advice from our experts and the WES Advisor archives. Whether you are actively looking for a job or just researching your options in North America, these tips can help you achieve your goals. 

PREPARE FOR YOUR JOB SEARCH

  1. Start by taking stock of your abilities. Do you lack any skills that could prevent you from obtaining the job of your dreams?
  1. If you lack key skills, consider completing a short training program at a vocational school or community college. Look for affordable career pathway programs that can help you enter the workforce as quickly as possible.
  1. Consider earning a stackable credential. You can earn these once you arrive in North America. For example, an international degree in business can be boosted with a stackable credential in management. Employers like to hire immigrants who have continued their education upon arrival. This will help you stand out as a job candidate.
  1. Be sure to update your profile on LinkedIn. Add your most recent job title, training, and skills. Your photo counts, too: Make sure you are using a clear, professional image.
  1. While you’re at it, check that you have a strong profile summary. That’s the description at the top of your personal page on LinkedIn. It is the first section a recruiter sees when they are searching for job candidates. Mention your most important job titles and specialized skills, so you show up in recruiter searches!

REACH OUT TO YOUR NETWORK

  1. Did you know that employee referrals are the best way to get hired? Connect with friends and former colleagues. Let them know what kind of role you are seeking, and provide them with a copy of your résumé. Your network may be able to refer you for a role that isn’t even advertised to the public yet.
  1. If you have a contact at the company you want to work for, reach out to them and ask for insights. You never know—your conversation could result in advice that helps you stand out in your job interview. Or they could connect you with a more senior hiring manager!
  1. Expand your network by attending events. You can meet new people at local career fairs, conferences, mentoring events, and industry meetups. You can even learn about job openings at regular social functions, like birthday parties, where you have the chance to meet new people outside of your usual circle.
  1. Ask former colleagues and supervisors to recommend you on LinkedIn. A recommendation is a short testimonial that endorses your work. It helps if you ask people who you know well and worked with closely. You might increase your chances if you offer to write one for them, in return.
  1. Discover the power of informational interviews. This is an informal meeting with a professional in your field. It is a chance for you to learn more about your desired industry, role, or organization. This is not only a great way to network, it could also lead to a referral!

WHAT DOCUMENTS DO YOU NEED?

  1. Did you know that employers spend an average of six seconds reviewing a résumé? So keep it short, and stick to the basics. Your résumé should not be longer than one page.
  1. Similarly, your résumé should be front-loaded with keywords. You should include some language that matches the job description for the position you are trying to fill. It’s a good idea to tailor your résumé to match each job that you apply for, even though that takes a little more effort. It will be worth it when you land the perfect job.
  1. You also need to prepare a strong cover letter. This document should tie together the bullet points from your résumé. But, like the résumé, keep it short! Aim for a one-page cover letter that describes your experience and why it makes you the perfect job candidate.
  1. Your cover letter is the perfect place to not only showcase your writing skills but also to brag about yourself! When writing your cover letter, emphasize your strengths and accomplishments. Tailor your cover letter to match the job description for every role you are pursuing. Do not use the same cover letter for each application!
  1. Even if you are not required to submit a portfolio, it is still a good idea to send the hiring manager samples of your prior work. This could include white papers, blueprints, marketing ads, clothing patterns, website designs, or any other examples of your accomplishments that match the job description. Hiring managers love when applicants go above and beyond!

GET A CREDENTIAL EVALUATION

  1. Another important document in your job search arsenal is a credential evaluation. This report is essential for internationally educated job seekers. It tells employers the equivalent of your degree in the U.S. or Canada, putting you on equal footing with local job candidates.
  1. Your credential evaluation also adds value by helping employers understand your previous career experience and licenses.
  1. Before you order a credential evaluation, determine which report is the best fit for your needs. For example, do you need a basic Document-by-Document evaluation (to evaluate your overall degree) or a more detailed Course-by-Course evaluation (to evaluate your transcripts and GPA)?
  1. Submit proof of your credential evaluation with your job application. It shows that you are a proactive job candidate who is prepared for a career in a new country. You should also bring this with you to your job interview.
  1. A credential evaluation has lifetime value. To make the most of your order, determine all of the ways you might use your report in the future. You can choose a package that comes with a Digital Badge, for example, if you would like to showcase your accomplishments on social media sites like LinkedIn. You can also order extra copies in advance.

ACE YOUR JOB INTERVIEW

  1. If you are contacted for a job interview, make sure you have developed your elevator pitch ahead of time. An elevator pitch is a 30-second speech in which you “sell yourself” to your potential employer. Your pitch should highlight the greatest achievements of your career.
  1. Plan responses to common interview questions ahead of time. Although there is no way to predict every question you may be asked, running through a “practice interview” with a friend or family member can help you build confidence and prepare for the actual interview.
  1. Arrive at your interview fully prepared. You should bring copies of your credential evaluation, résumé, and cover letter. Your interviewer may ask to see your documents again to verify a topic that comes up. You will look like a competent prospect if you have everything ready the moment they ask!
  1. Prepare a few questions about the job or the company. At the end of the interview, your interviewer will ask if you have any questions. You want to pose thoughtful questions that show you have thoroughly researched the company and are interested in learning more about the role.
  1. Follow up after the interview. To express your interest in the position, it is a good idea to send a thank-you email to your interviewers. Thank them for taking the time to speak with you, refer back to a topic you spoke about, and briefly reiterate why you are a good fit for the role. This is a common custom (and a polite gesture) in North America.

An Introduction to the IELTS Exam

by IDP

In this, the first of a three-part series, we will take you through the ins and outs of the International English Language Testing System (IELTS). We will talk about who should take the IELTS, what the test is, where you can take the test, why you need it, and when you can expect your results.
In future installments, we will talk about how you can best prepare for the test and what to expect on the day of the test.

Now that you have decided to study in or migrate to an English-speaking country, how can you demonstrate your language skills?

Having a standardized English test score may be important for you if you are applying to an academic institution in a country where English is the official language. It could also be important if you are migrating to an English speaking country. IELTS is a reliable and internationally recognized test score that can help you to achieve your goals.

What is IELTS?

IELTS was developed in the 1980s to test an individual’s English language proficiency.
IELTS is jointly owned by the British Council, IDP: IELTS Australia and Cambridge English Language Assessment. The combined expertise of these three international partners is what makes the test secure, reliable, and the most popular high-stakes English-language test. The test assesses the English language levels of people whose language skills range from beginner to expert in four language areas. Here are a few details about the IELTS:
  • International:
    • IELTS is accepted in 140 countries.
    • The test provides results to more than 9,000 institutions and organizations worldwide.
    • The results can be used for work, study, or migration purposes.
  • English skills assessment:
    • Listening
    • Reading
    • Writing
    • Speaking
  • Testing info:
    • There is a nine-point band scale that allows you to demonstrate how accurately you can use your English skills.
    • The entire test takes 2 hours and 44 minutes.
    • In most cases, you will be able to complete all four sections of the test on the same day, but you may have to take the speaking portion of the test on another day.
  • System:
    • There are a range of scores that you can obtain in each of the four skill areas.
    • Four different aspects are considered in the writing and speaking areas.
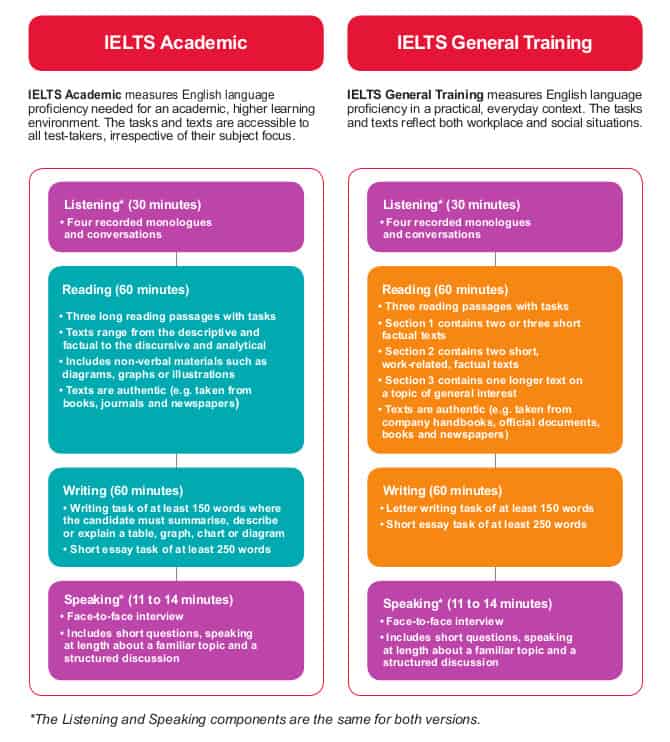
    • There are two different versions of the tests: Academic and General Training.

Who should take the IELTS test?

IELTS scores can be required for a variety of reasons. You may need to provide an academic institution with a standardized English test score. Some professional associations require a standardized English test score for official registration purposes. Governments in Australia, Canada, New Zealand, and the United Kingdom specifically require IELTS scores when granting work visas and citizenship.

Which version of the test is right for me?

There are two versions of the IELTS test: Academic and General.
Comparison chart of two IELTS testing types
  • Academic IELTS is designed for:
    • university or college applicants
    • those seeking registration in a professional association
    • individuals whose strengths are in literacy
  • General Training IELTS is designed for:
    • those who are planning to study abroad at high school or in a vocational program
    • visa requirements for people migrating to Australia, Canada, New Zealand, or the UK
    • individuals whose strengths may be in numeracy
Be sure to confirm which version is best for your particular situation, but be sure to consider General Training IELTS if it is an option.

Where do I take the IELTS exam?

The IELTS test is conducted at a test centre. Once you have booked an exam at your preferred test centre, you will need to go to the centre on your chosen date. All parts of the test are conducted at the centre and you will interact with people instead of computers.

How do I register for IELTS?

There are more than 450 IELTS test locations worldwide. More than 90 of these locations are in Canada—click here to find test locations by province.
Most IELTS test centres offer a convenient online booking system that is easy to use. To book online, you will need a clear, colour scan or photo of your passport and a credit card.
Most centres accept online registration, but a few centres will accept paper-based registration forms. To register for IELTS, you will need a valid passport or a Canadian Permanent Resident card if you are in Canada.
The test can be booked online by going to IELTS Essentials and clicking Book.

When can I take the IELTS test?

  • There are 48 test dates each year.
  • The Academic test is offered on all 48 dates.
  • The General Training test is offered on 24 dates.
  •  Availability at centres may vary depending on local demand.

When can I get my results?

  • Results are available 13 days after the test.
  • Unofficial results can be viewed online.
  • Official results or Test Report Forms (TRFs) are sent to receiving institutions (for example, universities and professional bodies).
  • One copy of the TRF will be sent directly to you; or two copies will be sent if you are applying for immigration or visas for Canada and the UK.
  • Candidates can request up to five (5) additional TRFs at no cost within 30 days of the test.
  • TRFs can be requested at any time within two years of the test date.
  • There is a correlation between IELTS scores and Canadian Language Benchmarks (CLB): CLB compared to IELTS score.
IELTS is an important tool to help you demonstrate and present your English language skills that are necessary for academic and migration acceptance. The IELTS system has a network of support and resources to help you with your journey towards achieving your educational and professional goals.
Be sure to read part two of this blog series, Preparing for the IELTS Exam, for info on preparation best practices, access to free test-prep resources, and more.

Source: WES.org

Canadian Banking: How Newcomers Can Build Credit

by Ivy Chiu

Moving to a new country presents allows you to pursue new personal and professional opportunities. By taking time to understand the financial system, immigrants can create a solid foundation for their new life. This could mean the difference between surviving and thriving during the first few years. While most newcomers are aware that Canada’s banking system differs from that of their home country, they often do not know what those differences entail.
Keep reading to see tips on how to bank and build credit in Canada:

Open a Bank Account Even if You Do Not Have a Job Yet

Many newcomers are surprised to learn that they can open a bank account without having a job. In their home country, they might not have been able to do so without being employed with a steady income. However, in Canada, opening a bank account is one of the first things newcomers should do—even if no funds are deposited right away.
The main types of accounts in Canada are chequing and savings accounts:
  • chequing account is for day-to-day banking. You will use the money in this account to make everyday purchases. With this account, you can deposit and withdraw at any time. This makes it a convenient and safe place to keep money.
  • savings account is ideal for setting aside money for larger costs, such as education or home furnishings. The balance in this account will earn interest and you can easily access your money when you need it.
When exploring options, ask about bill payments and the number of transactions that can be made every month without fees. Be sure to compare fees and interest rates for the different accounts, as well as features and offers. For example, RBC offers no monthly fees for newcomers for a period of time to help with settling in a new country. As long as you keep your account open for 90 days, there is no fee to close the account if your situation changes or you decide not to live in Canada permanently.

Start Building Credit Immediately

Many newcomers understand that building credit history is necessary to settling in Canada. But they may not know exactly how it works.
Credit history in Canada is a key factor to determine eligibility for a loan.
Canada’s central credit bureaus use credit history to provide a score that reflects credit worthiness. A credit score is built through financial transactions, such as the first time newcomers ask for a loan, set up utilities, or purchase a mobile plan—and it is built over time. The score is determined based on the evidence of how finances and repayment were managed. This is influenced, for example, by whether monthly bills are paid in a timely manner.
A good credit score helps newcomers qualify for loans and might lead to lower interest rates. This is helpful when buying a car, getting a mortgage, paying for school, and more.
Here are a few more important points about building and maintaining a credit score:
  • Everyone has their own credit score. If the credit card, car loan, or mortgage is in your spouse’s name only, the activity relates to the spouse’s credit score. Each person should build their own credit history.
  • Pay your bills on time. Credit reporting agencies track credit scores, so they know if you pay your bills on time: including your utilities, mobile phone, and credit card. This is why it is important to pay at least the minimum payment on time.
  • Regularly check your credit score. RBC personal banking clients can access their credit score right through the TransUnion CreditView Dashboard in their RBC online banking portal. Checking your credit score at least once a year helps detect any errors and protects against identity fraud by ensuring the information is accurate.
While every newcomer to Canada has their own set of distinct goals and circumstances, most are eager to learn how to navigate the Canadian financial language and landscape.  Do not hesitate to ask your bank’s client advisors about any questions you may have.

Starting a new life in Canada will be easier with a solid understanding of how to manage finances and build credit history. A promising future awaits.

Source: WES.org

Tax-Free Savings Accounts (TFSA): A popular investment option for newcomers in Canada

Opening a TFSA may be a good option for newcomers who wish to invest shortly after moving to Canada. An RBC poll revealed that of newcomers who have been in Canada for five years or less, seventy-one percent of them own an investment product and among them forty percent had invested in TFSAs, making it the most popular option. 

What is a TFSA?

TFSA stands for a ‘tax-free savings account.’  It is an investment product designed to help you save and earn tax-free returns. 

Eligibility criteria to invest in TFSAs

  • No earned income is required to start investing so you can open a TFSA immediately after moving and start saving right away! 
  • There is a limit on the amount you can deposit in a TFSA — up to CAD 6,000 per year for 2019.  
  • You must be the age of majority in your province of residence.
  • You will need a valid Social Insurance Number (SIN) to open a TFSA account.

Must-know information for contributions to TFSAs

  • The TFSA annual room limit varies for each year, is indexed to inflation, and rounded to the nearest $500.
  • It’s not mandatory to contribute the entire eligibility amount during the year.
  • The unused contribution accumulates and can be carried over to the following year. For instance, if the annual limit is $6,000, and you contribute $4,000 during 2019, the unused contribution of $2,000 will be added to your contribution limit for 2020. Therefore, if the limit set for 2020 is $6,000, your total eligible limit will be $8,000. 
  • If you withdraw from your TFSA, the full amount of your withdrawals can be put back in future years. Just be careful, as re-contributing in the same calendar year can result in an over-contribution that is subject to a penalty tax.
  • Withdrawals from TFSA are tax-free but contributions made to a TFSA are not tax-deductible.
  • TFSAs don’t have a lock-in period for funds, ensuring you can withdraw money whenever you need it. 

About Arrive x RBC

Arrive and RBC are committed to helping set you up for financial success in Canada. We know that figuring out your financial life in Canada is more than just finding a bank account; it’s also about finding the right partner to invest in your financial success. RBC is the largest bank in Canada* and here to be your partner in all of your financial needs.
Learn about your investment options in Canada by registering for our upcoming webinar.

* Based on market capitalization
Disclaimer:
This article offers general information only and is not intended as legal, financial or other professional advice. A professional advisor should be consulted regarding your specific situation. While information presented is believed to be factual and current, its accuracy is not guaranteed and it should not be regarded as a complete analysis of the subjects discussed. All expressions of opinion reflect the judgment of the author(s) as of the date of publication and are subject to change. No endorsement of any third parties or their advice, opinions, information, products or services is expressly given or implied by Royal Bank of Canada or its affiliates.
Source: RBC

How to Send Your Documents to WES in a Sealed Envelope

by Justine D’Souza
A WES evaluation report serves not only as a credential evaluation but also authentication of academic qualifications. This means that, in addition to providing an educational equivalency, WES verifies document authenticity. As part of the authentication process, WES requires that the appropriate educational authority seal documents and send them directly to WES.
Below are the answers to frequently asked questions about sending sealed envelopes to WES.

Does my reference number belong to my documents or the envelope?

To make it easier for our staff to match your documents with your account, please put your reference number on the front of the envelope. You do not need to place it on the individual documents.

Should I send my own photocopies in addition to the documents in the sealed envelope?

No. WES will only evaluate documents sent in the format stated on our website.

Which documents need to be sealed?

This varies based on your country of education. The Required Documents page on our website will tell you which documents need to be sealed and which documents, if any, can be sent as photocopies.

I am having trouble obtaining my documents in a sealed envelope. What should I do?

Many of our customers no longer live in their country of education. In this case, we generally recommend sending the Academic Records Request form to your institution so they can release your documents. If your school has closed, please contact our Customer Service team. Individuals educated in Afghanistan, Eritrea, Iraq, Syria, Turkey, Ukraine, or Venezuela who no longer have access to their academic documents may be eligible for the WES Gateway Program.

Does the Academic Records Request form need to be sealed?

Although the form is not a required document (unless specified on our website under your country of education), WES will only accept it as “official” if it comes in a sealed envelope.

How do I send translations if my transcripts are already sealed?

You can request an extra copy of your transcripts from your school and give this copy to the translator. Many institutions issue unofficial copies for students who want access to their records.

How do I send my documents if I obtained credentials at multiple universities?

You will need a separate sealed envelope for each institution.

Do I need to send my passport, birth certificates, or other official documents?

No, WES only needs the documents listed on our Required Documents page. If our evaluators determine that they need additional documentation, they will request it directly.

Should I send original documents in a sealed envelope?

For more information on this topic, read this article from our Help Center.

It will take a long time to have my documents sent to WES. Will my account stay open?

Yes. There is no deadline to submit your documents to WES. We will put your file on hold until we receive all documentation necessary to complete an evaluation.
Source: WES.org

Leave us a message

Check our online courses now

Check our online courses now
Click Here now!!!!

Subscribe to our newsletter

Vcita